This setup is perfect for remote media playback on your Raspberry Pi, either individually or across multiple devices, using a straightforward web interface. Perfect for stage shows, VJing, possibly any kind of media performance. It can also be automated via Web API for smarthome, digital signage, you name it!
Download Beta v2 ( 1,3GB, MD5 638e79cef9765d14526c030d48fa8756 )
It needs to be written to an SD Card with a software like Raspberry Imager, Etcher or dd. Boot up, look in the startup messages for the devices IP address and use your browser to control. To setup further, connect via SSH or a usb keyboard. Read on to learn more.
1. Access the Web Interface
- Boot from the SD Card, and it will display the Raspberry Pi’s IP address on the player’s screen at startup. After the screen goes blank, it is ready to play.
- Open this IP address in a web browser with the port
5000(e.g.,http://<your_pi_ip>:5000) to access the interface. - There is an example screenshot at the bottom of this page.
2. Media Storage
- Files are stored on a partition labeled
media. This partition is accessible on other computers when the SD card is inserted, making it easy to add or manage files offline. - Alternatively, you can upload files directly through the web interface while the script is running.
- Bigger SD Card? Use a keyboard or connect via SSH and run “sudo raspi-config”, then use the menu “Advanced” – “Expand Filesystem” to add the unused space.
3. Supported File Formats
- The script can handle various media types, including:
- Videos:
.mp4,.avi,.mkv - Audio:
.mp3,.wav,.ogg - Images:
.jpg,.png,.bmp
- Videos:
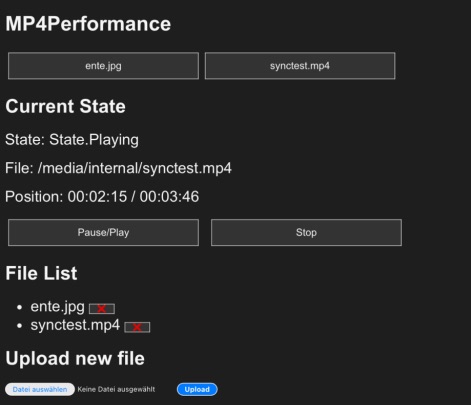
4. Media Interface ("/media")
- File Buttons: Starts playing the selected media file.
- Pause/Play: Toggles between pausing and resuming the playback.
- Stop: Stops the currently playing media.
- Upload: Allows you to upload new media files from your computer to the
mediapartition. - Delete: Deletes the selected file from the
mediapartition. - Multi Player: Opens the multi-player interface to control multiple players on the network (see section 5 below).

5. Multi-Player Interface (“/”)
- Scan for Instances: To control multiple players, enter the range of IP addresses for all Raspberry Pi devices on your network. Here’s how to determine the range:
- On startup, the IP address of each Raspberry Pi is displayed on its screen (e.g.,
10.0.1.3). - Since all devices on your network likely share the same subnet (e.g.,
10.0.1.x), you can specify the full range of possible addresses within that subnet. - If one player shows an IP of
10.0.1.3, enter the range for the entire subnet in the IP field as10.0.1.1-10.0.1.254. - Click the Button “Scan”. This will search and identify all Raspberry Pi devices on the
10.0.1.xsubnet, allowing you to control them simultaneously.
- On startup, the IP address of each Raspberry Pi is displayed on its screen (e.g.,
- Controls for Each Individual Player Found
- IP Display:
- Each player’s IP address is displayed, allowing you to identify each device individually in the interface.
- File Dropdown List:
- This dropdown is populated with the media files currently available on the selected player.
- How to Use: Click on the dropdown to see the list of files stored on that player. Select a file from the list to prepare it for playback. They will be started with the “Play Selected” or “Loop Selected” Button.
- Buttons Below Each Player:
- Play: Plays the selected file from the dropdown on that specific player.
- Loop Play: Continuously loops the selected file on that player until stopped.
- Stop: Stops any currently playing media on that specific player.
- Pause: Toggles Pause/Play of the current media playback on that player.
- Inspect: Opens the standard interface of that player, to control or manage files.
- IP Display:
- Controls for All Players That Have Files Selected
- Play Selected:
- This button plays the currently selected file (from each player’s dropdown) on all players where a file has been chosen.
- How to Use: After choosing files for each player from their dropdown lists, click “Play Selected” to start playback on all these players simultaneously.
- Loop Play Selected:
- This button loops the currently selected files on all players where a file has been chosen, continuously repeating playback until stopped.
- How to Use: Select files for each player from the dropdown, then click “Loop Play Selected” to have each file play in a loop across all selected players.
- Play Selected:
- Global Controls for All Players Found
- Pause All:
- Pauses playback on all players simultaneously. Any currently playing media on each player will pause, regardless of which file is playing.
- How to Use: Simply click “Pause All” to send pause to all players at once. It will toggle the current state.
- Stop All:
- Stops playback on all players, clearing any currently playing media across the entire group.
- How to Use: Click “Stop All” to halt media on every player within the selected IP range.
- Pause All:
6. Direct API Endpoints
- You can interact with the player directly through API endpoints if you prefer using command-line tools or scripts.
- Play:
http://<your_pi_ip>:5000/play?file=filename.mp4 - Pause/Play:
http://<your_pi_ip>:5000/pause - Stop:
http://<your_pi_ip>:5000/stop - Loop:
http://<your_pi_ip>:5000/loop?file=filename.mp4
- Play:
- You can call these from any software of making https requests, like wget on unix style terminals:
- wget “http://<your_pi_ip>:5000/play?file=filename.mp4”
Network Tips:
To make it easier to manage your players, consider configuring your router to assign consistent IP addresses. You can label each player with the last digit of its IP address to easily identify them. Many routers support setting a list of static IP addresses, or you can maximize the “DHCP lease time” to help ensure that each device retains the same IP over time.
For connecting to WiFi:
- Plug in a keyboard or connect via SSH (user: pi password: mp4museum)
- Open the configuration utility by running: sudo raspi-config
- Go to Localisation Options and set the WiFi Region to enable the WiFi interface.
- Use the Connect to WiFi dialog to enter your network name and password.
- After exiting the utility, confirm the reboot.
This will establish the WiFi connection and allow your player to connect to your network on startup.
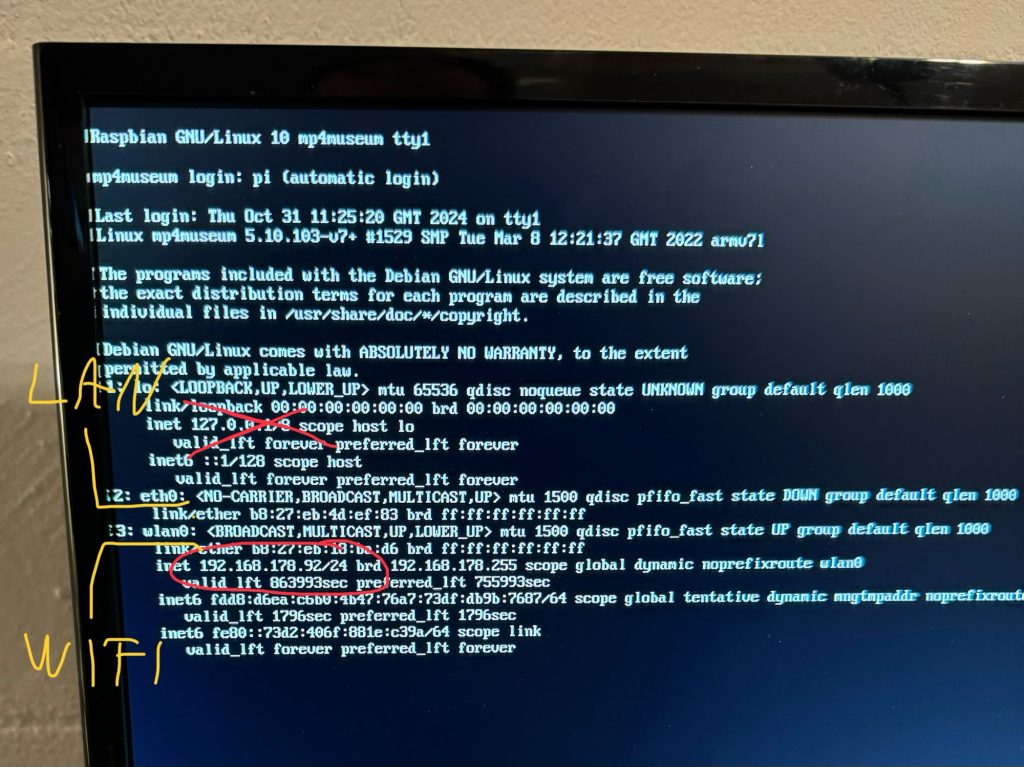
eth0 = Wired Network, wlan0 = Wireless. The IP starting with 127 is not an usable adress.